Spotify is one of the best music streaming services. Of course, some will disagree with this statement, but the numbers and longevity of the service don't lie.
ContentsWhat is Spicetify?How to customize Spotify with Spicetify1. Installing Spicetify on Windows2. Back up the Spicetify3 configuration files. Customizing Spotify with Spicetify4. Update Spotify with your custom theme5. Restore default Spotify themeImport more Spicetify themesOption 1:Copy and paste Spicetify themeOption 2:Import Spicetify themes from GitHubSpice up your Spotify with SpicetifyHowever, the Spotify desktop app isn't great. The colors are dull, the user interface is clunky and slow to load, and it can sometimes take a while to find what you're looking for.
Did you know Spotify is customizable? With the help of Spicetify, you can change the look of Spotify with themes and even add custom apps for additional functionality.
So here's how to customize Spotify with Spicetify.
Spicetify is an open-source Spotify customization tool that you use through the command line. Spicetify features include:
Spicetify is a command line tool only. This means that you make changes using a series of commands and changes to configuration files. It sounds a bit tricky, but with this tutorial, you'll be able to customize Spotify exactly the way you want.
AdvertisementA Spicetify theme consists of two configuration files. One configuration file controls colors and the other controls Spotify's styling and layout options (via a CSS file). If you've ever created a website, you've probably come across a Cascading Style Sheet (CSS) file, as they're commonly used to modify the appearance of websites and other types of online documents.
You don't need Spotify Premium to customize themes with Spicetify. Is Spotify Premium worth it? It depends on how often you want to hear the ads.
Getting started with Spicetify requires a few steps. Spicetify is available for Windows, macOS, and Linux, although the following steps only apply to Windows. You can find the instructions for macOS and Linux on the Spicetify GitHub page.
Before we start customizing, here is the default Spotify theme:
Advertisement

Let's install Spicetify on Windows.
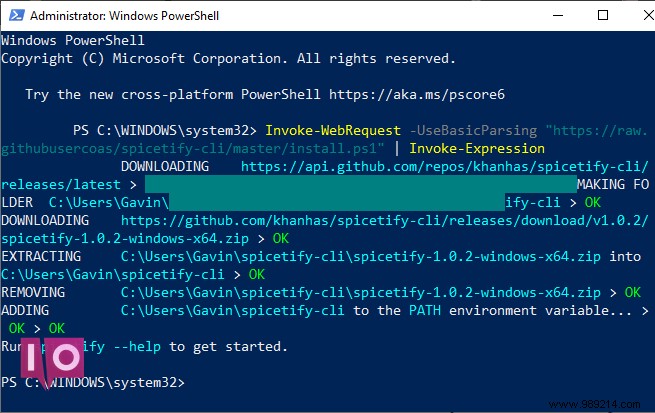
In the Start menu search bar, type PowerShell , then select Run as administrator . Now copy and paste the following command:
Invoke-WebRequest -UseBasicParsing "https://raw.githubusercontent.com/khanhas/spicetify-cli/master/install.ps1" | Invoke-Expression
Once the installation is complete, you can type spicetify –help to see the full list of commands. You can also skip to the next step to start customizing Spotify.
Advertisement
Remaining in PowerShell, entry specify, and press Enter to create the Spicetify configuration file.

Next, enter the following command to create a backup of the standard Spicetify configuration:
Advertisementspicetify backup apply enable-devtool
You are now ready to start customizing Spicetify. But keep PowerShell open.
At this point Spotify will also update with the default Spicetify theme which looks like this:
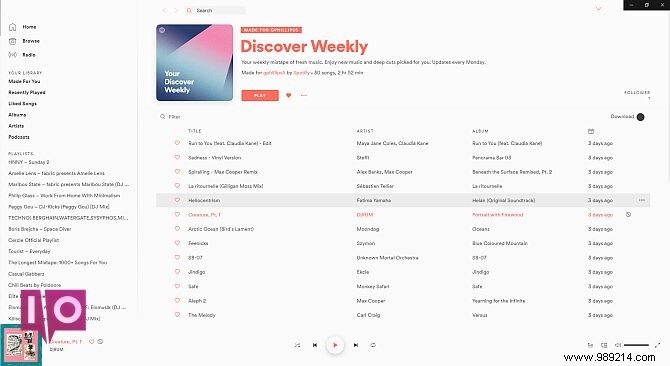
You can customize Spicetify in two ways:by creating your own color scheme or by using someone else's. Creating a copy of the standard Spicetify theme and then modifying it is an easy way to start customizing Spotify and learning how Spicetify works.
You can find the default Spicetify theme configuration at the following location:
C:Users[Your Name]spicetify-cliThemesSpicetifyDefault
Hold CTRL and click on each file to select both, then press CTRL+C to copy. Now head to
C:Users[Your Name].spicetifyThemes
Right-click and select New>Folder , then give your themes folder a name. Open the new folder and press CTRL+V to paste the default Spicetify configuration files. Your configuration should look like this:
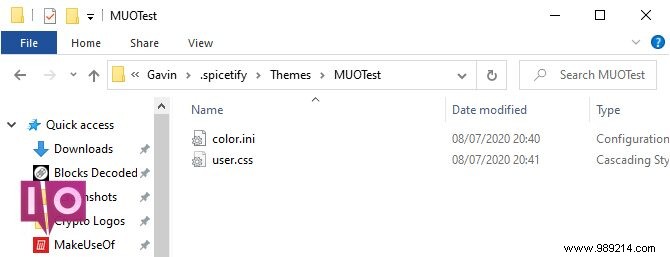
Open color.ini with a text editor, such as Notepad. Here you will see the hexadecimal color codes for the default theme. You will also notice that there are two color schemes, one for "Base" and one for "Dark". You can add multiple color schemes to a single color configuration file and switch between them using the main Spicetify configuration file (more on that in a moment).
Back to colors. Spicetify uses hexadecimal color codes, which appear as a six-character string (AF, 0-6). From here you can change the color scheme.
Head to HTML Color Codes for help finding hex codes as well as complementary colors. press CTRL+S to save your color scheme.
If you're not sure which colors to change, see the color.ini Reference Sheet at the bottom of the page.
Keep the current default CSS configuration.
Once you have chosen your Spotify theme colors, you can update Spicetify to import the theme. First, you need to specify your theme in the Spicetify configuration file.
Go back to C:Users[Your Name].spicetify and open configuration.ini .
Replace “SpicetifyDefault” with the name of your custom Spotify theme. press CTRL+S to save the configuration.
You can also note the "color_scheme" option, under "current_theme". If you are creating multiple color sets in a single color.ini file, this is where you type the name of the color set.
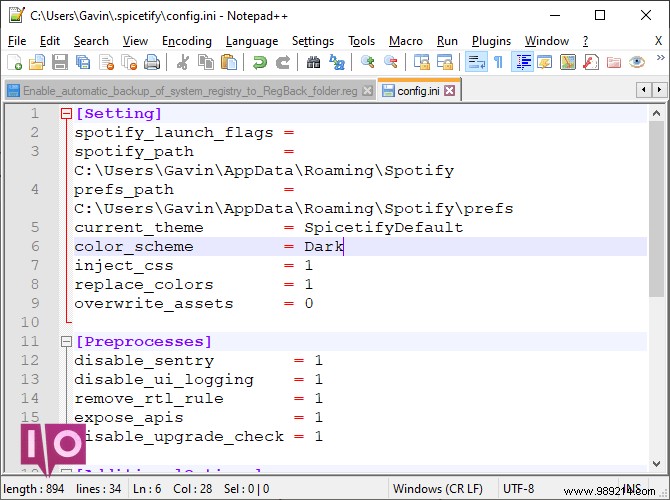
For example, the default Spicetify theme has two color schemes, Base and Dark. Entering either option here toggles between the two.
Alright, go back to PowerShell and enter the following:
spicetify apply
Now watch Spotify magically update with your color scheme!

If you want to restore Spotify to its default theme and remove any customization, Spicetify includes a simple command:
spicetify restore
You enter the command in PowerShell and it erases any Spicetify customization, restoring Spotify to its original configuration. The “restore” command is especially handy when you start creating custom CSS configuration files, because you might break something in the process.
If you want some inspiration or just want to easily switch between a bunch of new Spotify themes, you have two options.
The Spicetify Themes GitHub is a repository of custom Spotify themes. You can copy and paste the configuration for each theme you like, or you can clone the entire GitHub repository to your computer. The first option is slower, while the second option requires additional technical steps but makes it easier to switch between themes.
Read on to see both.
Let's start with the copy-paste method.
Find the Spicetify theme you want to copy. Head to your Spicetify themes folder (located in C:Users[Your Name].spicetify Themes) and create a new folder using the theme name.
Right-click and select New>Text Document .
Now go back to the Spicetify theme you want to copy. The two files you want, color.ini and user.css, are located here. Select color.ini to open the file contents and you will see the theme color scheme.
Drag your mouse over the color scheme to select each element, then press CTRL+C to copy. Go back to your new text document and press CTRL+V to paste the color scheme.
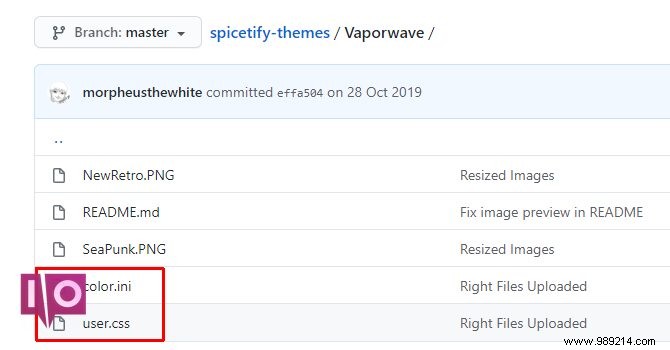
press CTRL+Shift+S to Save As . Save the file name as "color.ini". In the drop-down menu under the file name, change the file type to All Files .
You can now complete the same process for the user.css file, which changes the Spotify layout. Create a new text document, then copy and paste the contents of the user.css file into the new text document.
press CTRL+Shift+S to Save As . Save the file name as “user.css”. In the drop-down menu under the file name, change the file type to All Files .
Once you've saved the color scheme and CSS files, you can update the main configuration file to point to the new Spotify theme.
Go back to C:Users[Your Name].spicetify and open configuration.ini . Replace “SpicetifyDefault” with the name of your custom Spotify theme. press CTRL+S to save the configuration.
If copying and pasting individual files seems time-consuming, you can clone the entire Spicetify Themes GitHub repository to your local storage for easy access.
You need to download and configure GitHub Desktop, which only takes a moment. GitHub Desktop is a handy visual tool for interacting with GitHub, which you would normally do through the command line. Having a GUI makes it easier to use GitHub, especially if you've never used it before.
Download: GitHub Desktop for Windows or macOS (Free)

Double-click the file to install GitHub Desktop. Once the installation is complete, open GitHub Desktop. You don't need to create a GitHub account, but it does require you to add a username and email address to track any edits or comments you leave on GitHub projects.
Select Clone repository from internet in the GitHub Desktop menu, then open the URLs tab.
Copy and paste the Spicetify Themes Github URL in the top box (https://github.com/morpheusthewhite/spicetify-themes).
Navigate to the location of your Spicetify theme folder in the second box (C:Users[Your Name].spicetify Themes).
press Clone and wait for the process to complete.
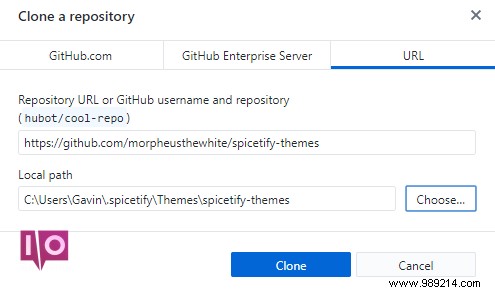
You will now find the GitHub repository files in your Spicetify themes folder. Now open the downloaded Spicetify Themes folder, press CTRL+A to select all, then press CTRL+X .
Go back to the existing Spicetify themes folder (not the folder you just downloaded, the folder you used for themes previously), and press CTRL+V paste.
You can now update your Spotify themes using the main Spicetify configuration file. Replace the "current_theme" with the theme of your choice and modify the "color_scheme" if desired (if available for the theme).
Save the config file, then run “spicetify apply” in PowerShell, and you're good to go.
Spicetify is a great way to breathe new life into the Spotify desktop. You can add color, change fonts, revise styling, and more. Then there's the Spicetify Extensions which you can use to modify or extend the functionality of Spotify.
Now, since your Spotify looks amazing, it's time to take a look at the mess of playlists in your sidebar. Discover the best tips and tricks for managing your Spotify playlists.